Microsoft Defender Not Turning ON
In general, the problem of Microsoft Defender Not Working is reported after users have just bought a New computer and also while switchig from a Third-party Antivirus program to Microsoft Defender. In case of New Computers, the problem is usually due to McAfee Antivirus Program being installed by default and this can be fixed by uninstalling McAfee Antivirus program from the computer. If you Can’t Switch ON Microsoft Defender, after uninstalling McAfee or another Antivirus program, the problem could be due to traces or previously installed Antivirus program still being active on the computer. In certain cases, the problem could also be due to Microsoft Defender being blocked or disabled by Malware/Viruses and other reasons. Tip: In stubborn cases, the only way to fix this problem is by using Reset This PC option (See Last Method below).
1. Remove Third-Party Antivirus Programs
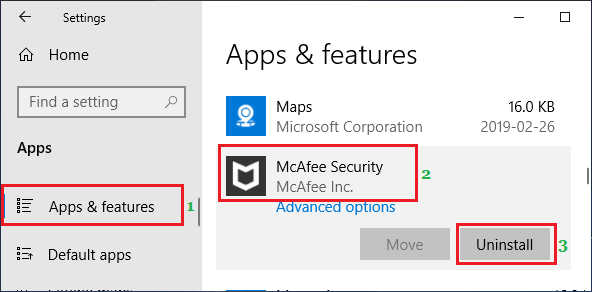
By default, Microsoft Defender gets automatically disabled, when it detects the presence of any third-party Antivirus program being installed on the computer. Hence, the need to remove all previously installed Antivirus programs from the computer. After which, you should be able to Enable Microsoft Defender protection. Go to Settings > Apps > In the right-pane, select the Antivirus Program that you want to remove and click on Uninstall.
Repeat the above steps to uninstall all versions & modules of Third-party antivirus programs installed on your computer.
2. Manually Enable Microsoft Defender
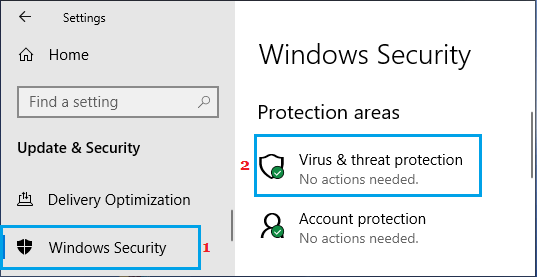
After removing Third-part antivirus programs, you may have to manually enable Microsoft Defender Antivirus protection on your computer. Go to Settings > Update & security > select Windows Security in the left-pane. In the right-pane, click on Virus & threat protection.
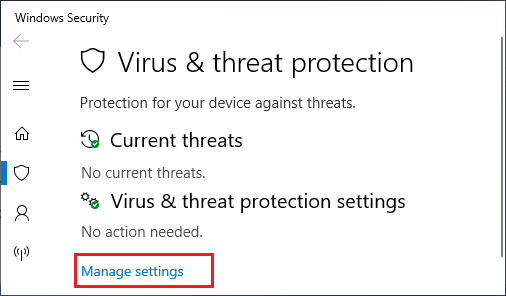
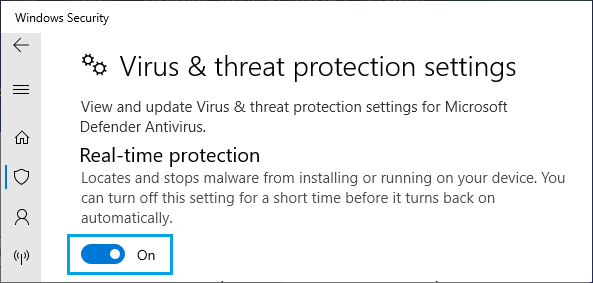
Scroll down on the next screen and click on Manage Settings Link located under “Virus & threat protection settings”.
On the next screen, Switch ON Real-Time Protection.
If want more protection, you can also Turn ON Cloud Delivered Protection as available on the same screen.
3. Use Antivirus Program Clean Up Tool
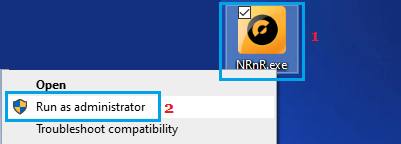
If you are unable to Enable Microsoft Defender, even after uninstalling third-party antivirus program, the problem could be due to traces of antivirus program still remaining on the computer. To fix this, you can make use of Antivirus Software Removal Tools as available on Microsoft’s support page. Download the Removal Tool as applicable for the antivirus program installed on your computer > Right-click on the Downloaded File and click on Run as Administrator option.
On the next screen, select Advanced option > click on Remove Only and wait for the tool to remove all traces of antivirus program from your computer.
4. Download Windows Security Troubleshooter
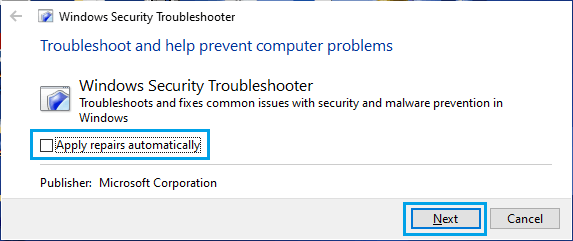
Go to Microsoft’s Windows Security Support page and click on the Download button to download Windows Security Troubleshooter on your computer. Once the File is downloaded, open the File and follow the instructions to Troubleshoot and fix Windows Security problems on your computer.
Note: You can also download the Troubleshooter to an External Storage Drive and Run the Troubleshooter from USB Drive to fix problems on your computer.
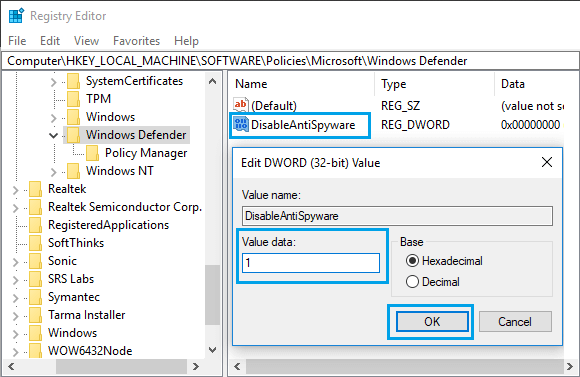
5. Check Windows Defender Registry
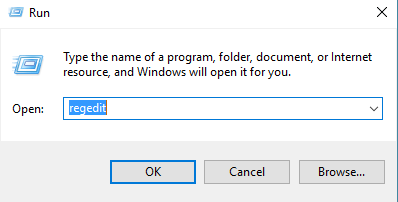
It is possible that Microsoft Defender has been permanently disabled on your computer by the third-party antivirus program that was previously installed on the computer. Right-click on the Start button and click on the Run. In the Run Command window, type Regedit and click on OK.
On Registry Editor Screen, navigate to HKEY_LOCAL_MACHINE\SOFTWARE\Policies\Microsoft\Windows Defender. In the right-pane, double-click on DisableAntiSpyware and change its Value Data from 1 to 0.
Note: 1 in Value data field Disables Windows Defender and 0 Enables Windows Defender. After this, restart your computer and see if you can enable Microsoft Defender Real Time Protection on your computer.
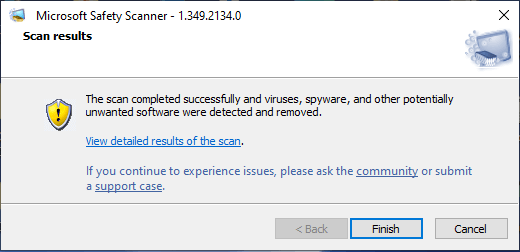
6. Scan PC Using Microsoft Safety Scanner
If you are still unable to Switch-ON Real-Time Protection by Microsoft Defender, it is good idea to check your computer for Malware by using Microsoft Safety Scanner. After the File is downloaded, open the File > select Type of Scan and click on the Scan button. Once, the scan is completed, you will be able to see the Scan results.
You can click on View Detailed Results option to see detailed scan results at %SYSTEMROOT%\debug\msert.log.
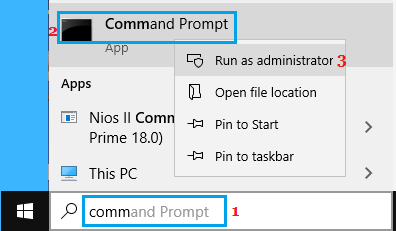
7. Run SFC Scan & DISM Tool
Run SFC Scan to rule out the possibility of System Files being damaged or corrupted on your computer. Type Command Prompt in the Search bar > right-click on Command Prompt and select Run as Administrator option.
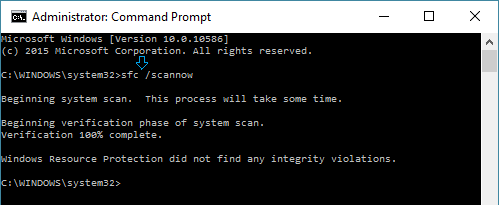
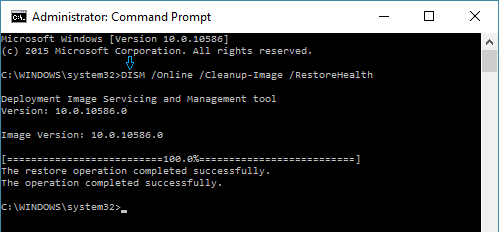
In the Command Prompt window, type sfc /scannow and press the Enter Key.
Patiently wait for Windows to scan your computer for System File Errors and fix them. After the SFC Scan is completed, type DISM /Online /Cleanup-Image /RestoreHealth and press the Enter Key.
Wait for the DISM tool to check your computer for errors and fix them. After the DISM command has finished running, restart your computer and see if you are now able to Enable Microsoft Defender Antivirus Protection on your computer.
8. Reset Computer
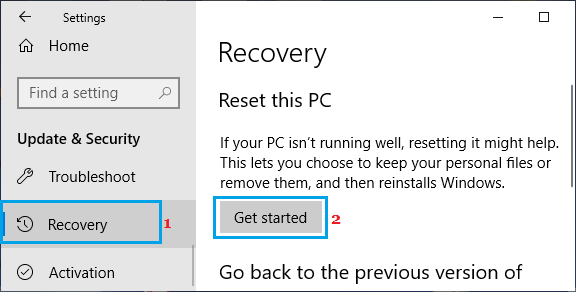
If above methods did not work, it is time to Reset the computer. This was the only method that worked in our case. The built-in “Reset This PC tool” provides the option to Remove Everything from the computer and Reinstall Windows OS and also the option to keep All your personal files intact and Reinstall Windows Operating System. Go to Settings > Update & security > Select Recovery the left pane. In the right-pane, click on Get Started option located under “Reset this PC” section.
On the next screen, select Keep My files option and follow the onscreen instructions to Reset your computer.
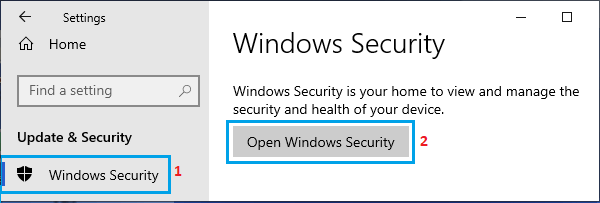
Once the Reset process is completed, go to Settings > Update & security > select Windows Security in the left-pane. In the right-pane, click on Open Windows Security.
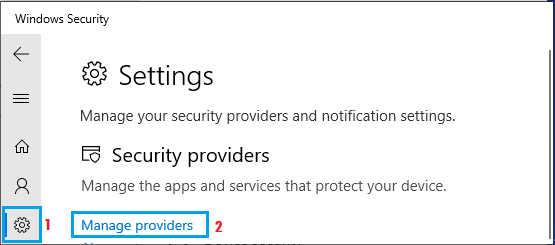
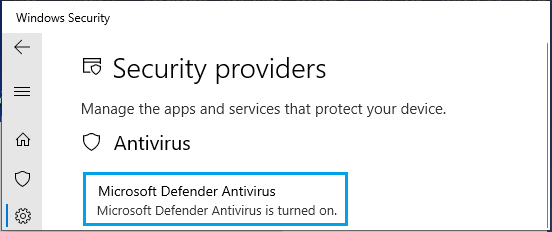
On the next screen, click on the Gear-shaped Settings Icon in left-pane. In the right-pane, click on Manage Providers link, located under “Security Providers”.
On the next screen, you should find Microsoft Defender Antivirus Turned ON.
If you find McAfee protecting your computer (instead of Microsoft Defender), you will have to Uninstall McAfee Antivirus program from your computer, using steps as provided in the first method (above).
How to Update or Reinstall Drivers In Windows 10 How to Free Up Hard Disk Storage Space in Windows 10