Recover Permanently Deleted Photos from iPhone
When you delete Photos from iPhone, the deleted Photos are simply moved to Recently Deleted Folder within Photos App and remain in this location for a period of 30 days. After 30 days, the deleted Photos are automatically removed from Recently Deleted Folder and get permanently deleted from iPhone. If the Photos were deleted a while ago (more than 30 days), they can only be recovered using an iCloud Backup or a Backup of iPhone stored on computer (Mac or PC).
1. Recover Recently Deleted Photos from iPhone
If the Photos were recently deleted (within last 30 days), they should still be available on your device in Recently Deleted Photos Album.
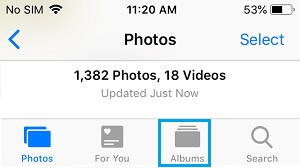
Open Photos App on your iPhone and tap on the Albums tab in bottom menu.
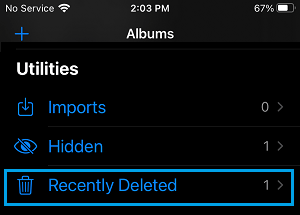
On Albums screen, scroll down to “Utilities” section and tap on Recently Deleted.
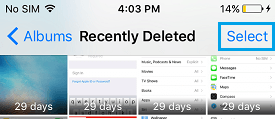
Once you are in Recently Deleted Photos, tap on the Select option located in the top right-corner.
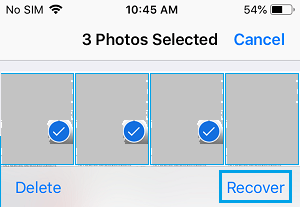
Next, select the Photos that you want to Recover by tapping on them and tap on Recover option in the bottom menu.
All the selected Photos will be recovered and moved back to Photo Album from which they were originally deleted.
2. Recover Permanently Deleted Photos from iPhone Using iCloud
Go to Settings > tap on your Apple ID > iCloud > iCloud Backup and check the date of iCloud Backup. If the Backup was made prior to deletion of Photos, it should contain deleted Photos and you can recover them by erasing all the current data on your iPhone and restoring your device from this iCloud Backup.
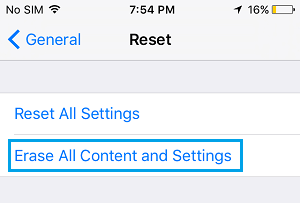
Go to Settings > General > Reset > tap on Erase All Content and Settings option.
On the confirmation pop-up, tap on Erase iPhone to confirm.
Wait for all the Data to be erased. During this period, you will see your iPhone restarting multiple times.
After the data is erased, you will see your iPhone starting with the Welcome or Hello screen.
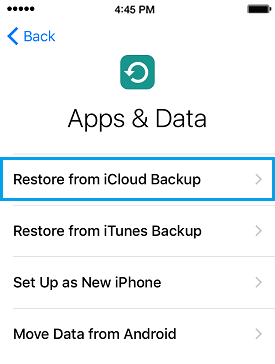
Follow the onscreen instructions, until you reach “Apps & Data” screen.
On Apps & Data screen, tap on Restore from iCloud Backup option.
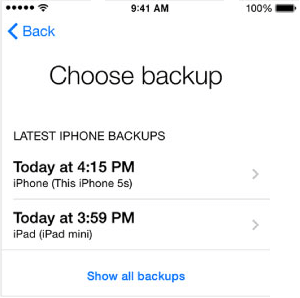
If prompted, enter your Apple ID and password to login to your iCloud Account. 7. On the next screen, select the iCloud Backup containing deleted Photos.
After iPhone is restored, you should be able to find Deleted Photos back on your device.
3. Recover Permanently Deleted Photos Using Backup Stored on Mac
If you had downloaded a Backup of iPhone on Mac (prior to deletion of Photos), you can follow the steps below to Recover Permanently Deleted Photos.
Connect iPhone to Mac using its supplied cable.
When prompted, unlock iPhone by enter the Lock Screen Passcode.
Next, click on the Finder Icon located in the taskbar on your Mac.
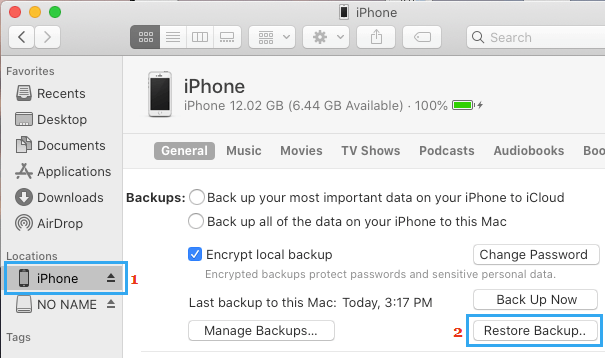
On the Finder screen, select your iPhone in the left pane. In the right pane, scroll down to ‘Backups’ section and click on Restore Backup button.
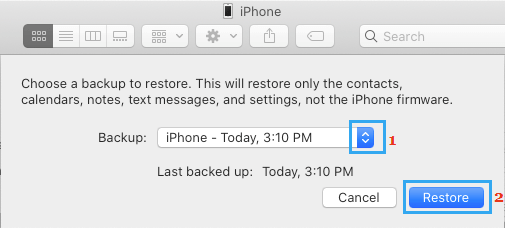
On the pop-up, select the iPhone Backup as available on your Mac and click on the Restore button.
Note: If the iPhone Backup File on your Mac is encrypted, you will be required to enter password to access encrypted file. 6. Wait for the Restore Process to be completed. Once iPhone is Restored, you should find all the Deleted Photos back on your device.
4. Recover Permanently Deleted Photos Using Backup stored on PC
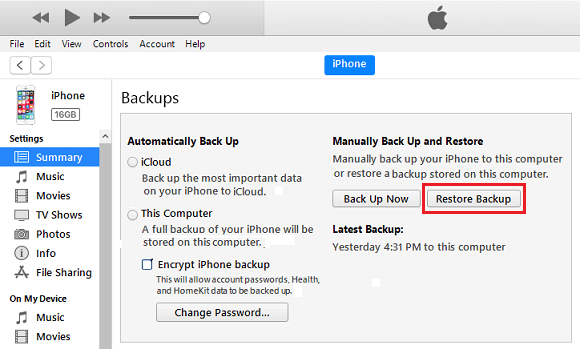
Similarly, if you had downloaded a Backup of iPhone to Windows PC, you can follow the steps below to Restore Deleted Photos back on your iPhone. Note: You need to Turn off Find my iPhone in order to restore iPhone from an existing iTunes backup. 1. Open iTunes on your Windows Computer. 2. Connect iPhone to Windows Computer using its supplied cable. 3. Next, click on the Phone icon as it appears in iTunes on the screen of your computer.
On the next screen, click on the Summary tab in left-pane. In the right-pane, click on Restore Backup button located under ‘Manually Back Up and Restore’ section.
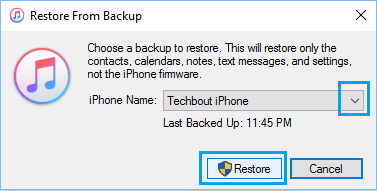
On the pop-up, select the iTunes backup located on your computer and click on the Restore button.
Note: If the iPhone Backup File on your computer is encrypted, you will be required to enter the password to access the encrypted file. 6. Wait for the Restore Process to be completed.
How to Manage and Free Up iCloud Storage Space How to Enable and Use iCloud Drive on iPhone
![]()
![]()
